Friday, February 24, 2012

Skin Color Correction in Adobe Photoshop Elements || Red, Cyan & Yellow color corrections for natural skin color.

Skin Color Correction is one of the main topic which is discussed many times in various Photo Editing workshops, Conferences and popularly in Fashion workshops. Today we are going to discuss some very basic workflows which can help you getting decent skin colors are adjustments. This article is mainly around some basic tools which can be used to correct colors in general, but example is mainly for skin color. Let's check out these basics and see how these work for you...

Skin Color Correction is one of the main topic which is discussed many times in various Photo Editing workshops, Conferences and popularly in Fashion workshops. Today we are going to discuss some very basic workflows which can help you getting decent skin colors are adjustments. This article is mainly around some basic tools which can be used to correct colors in general, but example is mainly for skin color. Let's check out these basics and see how these work for you.. Before we start with Color Correction in Adobe Photoshop Elements, let us make this clear that skin color varies from one region of the world to other and so values of basic colors. But method we will discuss should be helpful in handling all natural shades of human skin.1. As a logical step, we would want to open the photograph in Adobe Camera Raw Dialog, so just go to File Menu and select Open as option as shown in the image below 2. Following dialog will be opened. Select the Photograph and open as a Camera Raw file which can be defined in the second dropdown3. The very basic idea to open in Adobe Camera Raw dialog is to do some basic adjustments like Auto White-Balancing etc4. Notice the huge difference by just selecting Auto option in White-Balance Control of Adobe Camera Raw Dialog in Photoshop Elements5. When done with basic adjustments in Adobe Camera Raw dialog, click on Open File button which will open the photograph in Adobe Photoshop Elements Editor workspace. Now go to Adjustment Layer options and select Hue/Saturation Adjustment Layer in Adobe Photoshop Elements as shown in image below.6. At first we select Yellow channel and played with Saturation slider mainly. This photograph was too vibrant, probably due to wrong White balance and odd light conditions while photo was shot. Saturation is too high, so we reduced it for yellow. Image below shows the photograph before change7. Here are results after reducing Saturation for Yellow channel and then moved to Cyan and also played with Red8. Hope you got the idea of playing with different colors channels and their saturation level. This gives lot of flexibility in controlling Saturation, luminance and Hues of various color channels like Red, Green, Blue, Yellow, Cyan and Meganta8. As an added thing we can continue to play around with other Adjustement layers for Birghtness, Contrast etc...

 Before we start with Color Correction in Adobe Photoshop Elements, let us make this clear that skin color varies from one region of the world to other and so values of basic colors. But method we will discuss should be helpful in handling all natural shades of human skin. 

1. As a logical step, we would want to open the photograph in Adobe Camera Raw Dialog, so just go to File Menu and select Open as option as shown in the image below.
Skin Color Correction is one of the main topic which is discussed many times in various Photo Editing workshops, Conferences and popularly in Fashion workshops. Today we are going to discuss some very basic workflows which can help you getting decent skin colors are adjustments. This article is mainly around some basic tools which can be used to correct colors in general, but example is mainly for skin color. Let's check out these basics and see how these work for you.. Before we start with Color Correction in Adobe Photoshop Elements, let us make this clear that skin color varies from one region of the world to other and so values of basic colors. But method we will discuss should be helpful in handling all natural shades of human skin.1. As a logical step, we would want to open the photograph in Adobe Camera Raw Dialog, so just go to File Menu and select Open as option as shown in the image below 2. Following dialog will be opened. Select the Photograph and open as a Camera Raw file which can be defined in the second dropdown3. The very basic idea to open in Adobe Camera Raw dialog is to do some basic adjustments like Auto White-Balancing etc4. Notice the huge difference by just selecting Auto option in White-Balance Control of Adobe Camera Raw Dialog in Photoshop Elements5. When done with basic adjustments in Adobe Camera Raw dialog, click on Open File button which will open the photograph in Adobe Photoshop Elements Editor workspace. Now go to Adjustment Layer options and select Hue/Saturation Adjustment Layer in Adobe Photoshop Elements as shown in image below.6. At first we select Yellow channel and played with Saturation slider mainly. This photograph was too vibrant, probably due to wrong White balance and odd light conditions while photo was shot. Saturation is too high, so we reduced it for yellow. Image below shows the photograph before change7. Here are results after reducing Saturation for Yellow channel and then moved to Cyan and also played with Red8. Hope you got the idea of playing with different colors channels and their saturation level. This gives lot of flexibility in controlling Saturation, luminance and Hues of various color channels like Red, Green, Blue, Yellow, Cyan and Meganta8. As an added thing we can continue to play around with other Adjustement layers for Birghtness, Contrast etc...

2. Following dialog will be opened. Select the Photograph and open as a Camera Raw file which can be defined in the second dropdown.

Skin Color Correction is one of the main topic which is discussed many times in various Photo Editing workshops, Conferences and popularly in Fashion workshops. Today we are going to discuss some very basic workflows which can help you getting decent skin colors are adjustments. This article is mainly around some basic tools which can be used to correct colors in general, but example is mainly for skin color. Let's check out these basics and see how these work for you.. Before we start with Color Correction in Adobe Photoshop Elements, let us make this clear that skin color varies from one region of the world to other and so values of basic colors. But method we will discuss should be helpful in handling all natural shades of human skin.1. As a logical step, we would want to open the photograph in Adobe Camera Raw Dialog, so just go to File Menu and select Open as option as shown in the image below 2. Following dialog will be opened. Select the Photograph and open as a Camera Raw file which can be defined in the second dropdown3. The very basic idea to open in Adobe Camera Raw dialog is to do some basic adjustments like Auto White-Balancing etc4. Notice the huge difference by just selecting Auto option in White-Balance Control of Adobe Camera Raw Dialog in Photoshop Elements5. When done with basic adjustments in Adobe Camera Raw dialog, click on Open File button which will open the photograph in Adobe Photoshop Elements Editor workspace. Now go to Adjustment Layer options and select Hue/Saturation Adjustment Layer in Adobe Photoshop Elements as shown in image below.6. At first we select Yellow channel and played with Saturation slider mainly. This photograph was too vibrant, probably due to wrong White balance and odd light conditions while photo was shot. Saturation is too high, so we reduced it for yellow. Image below shows the photograph before change7. Here are results after reducing Saturation for Yellow channel and then moved to Cyan and also played with Red8. Hope you got the idea of playing with different colors channels and their saturation level. This gives lot of flexibility in controlling Saturation, luminance and Hues of various color channels like Red, Green, Blue, Yellow, Cyan and Meganta8. As an added thing we can continue to play around with other Adjustement layers for Birghtness, Contrast etc...

3. The very basic idea to open in Adobe Camera Raw dialog is to do some basic adjustments like Auto White-Balancing etc.

Skin Color Correction is one of the main topic which is discussed many times in various Photo Editing workshops, Conferences and popularly in Fashion workshops. Today we are going to discuss some very basic workflows which can help you getting decent skin colors are adjustments. This article is mainly around some basic tools which can be used to correct colors in general, but example is mainly for skin color. Let's check out these basics and see how these work for you.. Before we start with Color Correction in Adobe Photoshop Elements, let us make this clear that skin color varies from one region of the world to other and so values of basic colors. But method we will discuss should be helpful in handling all natural shades of human skin.1. As a logical step, we would want to open the photograph in Adobe Camera Raw Dialog, so just go to File Menu and select Open as option as shown in the image below 2. Following dialog will be opened. Select the Photograph and open as a Camera Raw file which can be defined in the second dropdown3. The very basic idea to open in Adobe Camera Raw dialog is to do some basic adjustments like Auto White-Balancing etc4. Notice the huge difference by just selecting Auto option in White-Balance Control of Adobe Camera Raw Dialog in Photoshop Elements5. When done with basic adjustments in Adobe Camera Raw dialog, click on Open File button which will open the photograph in Adobe Photoshop Elements Editor workspace. Now go to Adjustment Layer options and select Hue/Saturation Adjustment Layer in Adobe Photoshop Elements as shown in image below.6. At first we select Yellow channel and played with Saturation slider mainly. This photograph was too vibrant, probably due to wrong White balance and odd light conditions while photo was shot. Saturation is too high, so we reduced it for yellow. Image below shows the photograph before change7. Here are results after reducing Saturation for Yellow channel and then moved to Cyan and also played with Red8. Hope you got the idea of playing with different colors channels and their saturation level. This gives lot of flexibility in controlling Saturation, luminance and Hues of various color channels like Red, Green, Blue, Yellow, Cyan and Meganta8. As an added thing we can continue to play around with other Adjustement layers for Birghtness, Contrast etc...

4. Notice the huge difference by just selecting Auto option in White-Balance Control of Adobe Camera Raw Dialog in Photoshop Elements.

Skin Color Correction is one of the main topic which is discussed many times in various Photo Editing workshops, Conferences and popularly in Fashion workshops. Today we are going to discuss some very basic workflows which can help you getting decent skin colors are adjustments. This article is mainly around some basic tools which can be used to correct colors in general, but example is mainly for skin color. Let's check out these basics and see how these work for you.. Before we start with Color Correction in Adobe Photoshop Elements, let us make this clear that skin color varies from one region of the world to other and so values of basic colors. But method we will discuss should be helpful in handling all natural shades of human skin.1. As a logical step, we would want to open the photograph in Adobe Camera Raw Dialog, so just go to File Menu and select Open as option as shown in the image below 2. Following dialog will be opened. Select the Photograph and open as a Camera Raw file which can be defined in the second dropdown3. The very basic idea to open in Adobe Camera Raw dialog is to do some basic adjustments like Auto White-Balancing etc4. Notice the huge difference by just selecting Auto option in White-Balance Control of Adobe Camera Raw Dialog in Photoshop Elements5. When done with basic adjustments in Adobe Camera Raw dialog, click on Open File button which will open the photograph in Adobe Photoshop Elements Editor workspace. Now go to Adjustment Layer options and select Hue/Saturation Adjustment Layer in Adobe Photoshop Elements as shown in image below.6. At first we select Yellow channel and played with Saturation slider mainly. This photograph was too vibrant, probably due to wrong White balance and odd light conditions while photo was shot. Saturation is too high, so we reduced it for yellow. Image below shows the photograph before change7. Here are results after reducing Saturation for Yellow channel and then moved to Cyan and also played with Red8. Hope you got the idea of playing with different colors channels and their saturation level. This gives lot of flexibility in controlling Saturation, luminance and Hues of various color channels like Red, Green, Blue, Yellow, Cyan and Meganta8. As an added thing we can continue to play around with other Adjustement layers for Birghtness, Contrast etc...

5. When done with basic adjustments in Adobe Camera Raw dialog, click on Open File button which will open the photograph in Adobe Photoshop Elements Editor workspace. Now go to Adjustment Layer options and select Hue/Saturation Adjustment Layer in Adobe Photoshop Elements as shown in image below.

Skin Color Correction is one of the main topic which is discussed many times in various Photo Editing workshops, Conferences and popularly in Fashion workshops. Today we are going to discuss some very basic workflows which can help you getting decent skin colors are adjustments. This article is mainly around some basic tools which can be used to correct colors in general, but example is mainly for skin color. Let's check out these basics and see how these work for you.. Before we start with Color Correction in Adobe Photoshop Elements, let us make this clear that skin color varies from one region of the world to other and so values of basic colors. But method we will discuss should be helpful in handling all natural shades of human skin.1. As a logical step, we would want to open the photograph in Adobe Camera Raw Dialog, so just go to File Menu and select Open as option as shown in the image below 2. Following dialog will be opened. Select the Photograph and open as a Camera Raw file which can be defined in the second dropdown3. The very basic idea to open in Adobe Camera Raw dialog is to do some basic adjustments like Auto White-Balancing etc4. Notice the huge difference by just selecting Auto option in White-Balance Control of Adobe Camera Raw Dialog in Photoshop Elements5. When done with basic adjustments in Adobe Camera Raw dialog, click on Open File button which will open the photograph in Adobe Photoshop Elements Editor workspace. Now go to Adjustment Layer options and select Hue/Saturation Adjustment Layer in Adobe Photoshop Elements as shown in image below.6. At first we select Yellow channel and played with Saturation slider mainly. This photograph was too vibrant, probably due to wrong White balance and odd light conditions while photo was shot. Saturation is too high, so we reduced it for yellow. Image below shows the photograph before change7. Here are results after reducing Saturation for Yellow channel and then moved to Cyan and also played with Red8. Hope you got the idea of playing with different colors channels and their saturation level. This gives lot of flexibility in controlling Saturation, luminance and Hues of various color channels like Red, Green, Blue, Yellow, Cyan and Meganta8. As an added thing we can continue to play around with other Adjustement layers for Birghtness, Contrast etc...

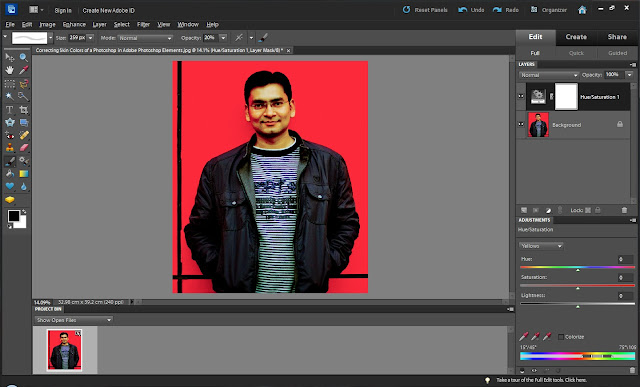
6. At first we select Yellow channel and played with Saturation slider mainly. This photograph was too vibrant, probably due to wrong White balance and odd light conditions while photo was shot. Saturation is too high, so we reduced it for yellow. Image below shows the photograph before change.

Skin Color Correction is one of the main topic which is discussed many times in various Photo Editing workshops, Conferences and popularly in Fashion workshops. Today we are going to discuss some very basic workflows which can help you getting decent skin colors are adjustments. This article is mainly around some basic tools which can be used to correct colors in general, but example is mainly for skin color. Let's check out these basics and see how these work for you.. Before we start with Color Correction in Adobe Photoshop Elements, let us make this clear that skin color varies from one region of the world to other and so values of basic colors. But method we will discuss should be helpful in handling all natural shades of human skin.1. As a logical step, we would want to open the photograph in Adobe Camera Raw Dialog, so just go to File Menu and select Open as option as shown in the image below 2. Following dialog will be opened. Select the Photograph and open as a Camera Raw file which can be defined in the second dropdown3. The very basic idea to open in Adobe Camera Raw dialog is to do some basic adjustments like Auto White-Balancing etc4. Notice the huge difference by just selecting Auto option in White-Balance Control of Adobe Camera Raw Dialog in Photoshop Elements5. When done with basic adjustments in Adobe Camera Raw dialog, click on Open File button which will open the photograph in Adobe Photoshop Elements Editor workspace. Now go to Adjustment Layer options and select Hue/Saturation Adjustment Layer in Adobe Photoshop Elements as shown in image below.6. At first we select Yellow channel and played with Saturation slider mainly. This photograph was too vibrant, probably due to wrong White balance and odd light conditions while photo was shot. Saturation is too high, so we reduced it for yellow. Image below shows the photograph before change7. Here are results after reducing Saturation for Yellow channel and then moved to Cyan and also played with Red8. Hope you got the idea of playing with different colors channels and their saturation level. This gives lot of flexibility in controlling Saturation, luminance and Hues of various color channels like Red, Green, Blue, Yellow, Cyan and Meganta8. As an added thing we can continue to play around with other Adjustement layers for Birghtness, Contrast etc...

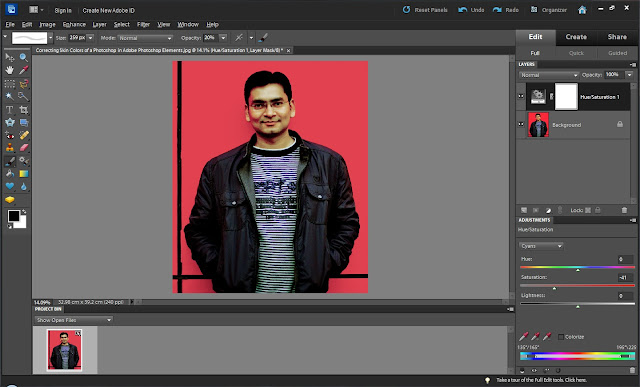
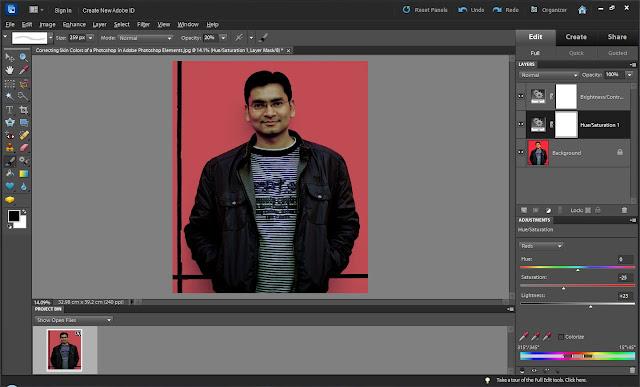
7. Here are results after reducing Saturation for Yellow channel and then moved to Cyan and also played with Red.

Skin Color Correction is one of the main topic which is discussed many times in various Photo Editing workshops, Conferences and popularly in Fashion workshops. Today we are going to discuss some very basic workflows which can help you getting decent skin colors are adjustments. This article is mainly around some basic tools which can be used to correct colors in general, but example is mainly for skin color. Let's check out these basics and see how these work for you.. Before we start with Color Correction in Adobe Photoshop Elements, let us make this clear that skin color varies from one region of the world to other and so values of basic colors. But method we will discuss should be helpful in handling all natural shades of human skin.1. As a logical step, we would want to open the photograph in Adobe Camera Raw Dialog, so just go to File Menu and select Open as option as shown in the image below 2. Following dialog will be opened. Select the Photograph and open as a Camera Raw file which can be defined in the second dropdown3. The very basic idea to open in Adobe Camera Raw dialog is to do some basic adjustments like Auto White-Balancing etc4. Notice the huge difference by just selecting Auto option in White-Balance Control of Adobe Camera Raw Dialog in Photoshop Elements5. When done with basic adjustments in Adobe Camera Raw dialog, click on Open File button which will open the photograph in Adobe Photoshop Elements Editor workspace. Now go to Adjustment Layer options and select Hue/Saturation Adjustment Layer in Adobe Photoshop Elements as shown in image below.6. At first we select Yellow channel and played with Saturation slider mainly. This photograph was too vibrant, probably due to wrong White balance and odd light conditions while photo was shot. Saturation is too high, so we reduced it for yellow. Image below shows the photograph before change7. Here are results after reducing Saturation for Yellow channel and then moved to Cyan and also played with Red8. Hope you got the idea of playing with different colors channels and their saturation level. This gives lot of flexibility in controlling Saturation, luminance and Hues of various color channels like Red, Green, Blue, Yellow, Cyan and Meganta8. As an added thing we can continue to play around with other Adjustement layers for Birghtness, Contrast etc...

8. Hope you got the idea of playing with different colors channels and their saturation level. This gives lot of flexibility in controlling Saturation, luminance and Hues of various color channels like Red, Green, Blue, Yellow, Cyan and Meganta.

Skin Color Correction is one of the main topic which is discussed many times in various Photo Editing workshops, Conferences and popularly in Fashion workshops. Today we are going to discuss some very basic workflows which can help you getting decent skin colors are adjustments. This article is mainly around some basic tools which can be used to correct colors in general, but example is mainly for skin color. Let's check out these basics and see how these work for you.. Before we start with Color Correction in Adobe Photoshop Elements, let us make this clear that skin color varies from one region of the world to other and so values of basic colors. But method we will discuss should be helpful in handling all natural shades of human skin.1. As a logical step, we would want to open the photograph in Adobe Camera Raw Dialog, so just go to File Menu and select Open as option as shown in the image below 2. Following dialog will be opened. Select the Photograph and open as a Camera Raw file which can be defined in the second dropdown3. The very basic idea to open in Adobe Camera Raw dialog is to do some basic adjustments like Auto White-Balancing etc4. Notice the huge difference by just selecting Auto option in White-Balance Control of Adobe Camera Raw Dialog in Photoshop Elements5. When done with basic adjustments in Adobe Camera Raw dialog, click on Open File button which will open the photograph in Adobe Photoshop Elements Editor workspace. Now go to Adjustment Layer options and select Hue/Saturation Adjustment Layer in Adobe Photoshop Elements as shown in image below.6. At first we select Yellow channel and played with Saturation slider mainly. This photograph was too vibrant, probably due to wrong White balance and odd light conditions while photo was shot. Saturation is too high, so we reduced it for yellow. Image below shows the photograph before change7. Here are results after reducing Saturation for Yellow channel and then moved to Cyan and also played with Red8. Hope you got the idea of playing with different colors channels and their saturation level. This gives lot of flexibility in controlling Saturation, luminance and Hues of various color channels like Red, Green, Blue, Yellow, Cyan and Meganta8. As an added thing we can continue to play around with other Adjustement layers for Birghtness, Contrast etc...

8. As an added thing we can continue to play around with other Adjustement layers for Birghtness, Contrast etc... Hope the Final results shown on very first photograph are reasonable and you are able to simulate similar ones. Please feel free to leave your comments about the article or your further queries around the same.

No comments:

Post a Comment

Search This Blog