Monday, September 26, 2011

New Features in 10th Version - Great news for Facebook users : Tag your friends in Organizer only !!!

With recent release of Adobe Photoshop Elements, there is a wonderful capability added in organizer where-in we can face tag people in Organizer and same folks will automatically tagged on Facebook. Isn't it Cool? Let's see how it's possible with few clicks.. First of all, just have a look at first image where facebook tagging is happening -

With recent release of Adobe Photoshop Elements, there is a wonderful capability added in organizer where-in we can face tag people in Organizer and same folks will automatically tagged on Facebook. Isn't it Cool? Let's see how it's possible with few clicks.. First of all, just have a look at first image where facebook tagging is happening -Just click on this image to see the large version and note facebook contacts as suggestions... Now, let's see how to achieve this capability in Elements Organizer... Let's go step by steps and hope that you will soon realize the way it works :1. Select a photograph in your Organizer and go to Share Tab on right.2. Click on 'Share to Facebook'3. Following dialog will be shown on clicking Facebook option.4. Now check the option for downloading facebook contacts and click Authorize...5. If you don't read carefully you will click on 'Complete Authorization' button in this dialog, but you are not done. It will show 'Error' dialog as you see below.6. After clicking Authorize, just go to your browser and click Allow button. Here you are authorizing Elements Organizer to use your contacts on Facebook7. When you click Authorize, now click 'Complete Authorization'.8. to continue with your upload, just fill the form shown below. It will information like Album Name, Location and Description etc.9. Click Done and file will be uploaded in few seconds depending upon size selected.10. The dialog shown above will be shown till file gets uploaded. After this, your Photograph should be visible on your Wall. But one thing would be missing :) ... No Face tags as of now :11. Now just go to Face Recognition workflow and see if you are able to see Facebook names while tagging faces. If, not Download contacts again by clicking 'Download/Update friends list to name people'.12. It will simply update your local contacts with all friends on Facebook. Go ahead with your tagging and whenever you upload tagged photographs, people will automatically be tagged on facebook. No extra effort after upload workflow.Time to try it out with your photographs and share your experiences.


Just click on this image to see the large version and note facebook contacts as suggestions... Now, let's see how to achieve this capability in Elements Organizer... Let's go step by steps and hope that you will soon realize the way it works :)

1. Select a photograph in your Organizer and go to Share Tab on right. 

2. Click on 'Share to Facebook'

With recent release of Adobe Photoshop Elements, there is a wonderful capability added in organizer where-in we can face tag people in Organizer and same folks will automatically tagged on Facebook. Isn't it Cool? Let's see how it's possible with few clicks.. First of all, just have a look at first image where facebook tagging is happening -Just click on this image to see the large version and note facebook contacts as suggestions... Now, let's see how to achieve this capability in Elements Organizer... Let's go step by steps and hope that you will soon realize the way it works :1. Select a photograph in your Organizer and go to Share Tab on right.2. Click on 'Share to Facebook'3. Following dialog will be shown on clicking Facebook option.4. Now check the option for downloading facebook contacts and click Authorize...5. If you don't read carefully you will click on 'Complete Authorization' button in this dialog, but you are not done. It will show 'Error' dialog as you see below.6. After clicking Authorize, just go to your browser and click Allow button. Here you are authorizing Elements Organizer to use your contacts on Facebook7. When you click Authorize, now click 'Complete Authorization'.8. to continue with your upload, just fill the form shown below. It will information like Album Name, Location and Description etc.9. Click Done and file will be uploaded in few seconds depending upon size selected.10. The dialog shown above will be shown till file gets uploaded. After this, your Photograph should be visible on your Wall. But one thing would be missing :) ... No Face tags as of now :11. Now just go to Face Recognition workflow and see if you are able to see Facebook names while tagging faces. If, not Download contacts again by clicking 'Download/Update friends list to name people'.12. It will simply update your local contacts with all friends on Facebook. Go ahead with your tagging and whenever you upload tagged photographs, people will automatically be tagged on facebook. No extra effort after upload workflow.Time to try it out with your photographs and share your experiences.

3. Following dialog will be shown on clicking Facebook option.

With recent release of Adobe Photoshop Elements, there is a wonderful capability added in organizer where-in we can face tag people in Organizer and same folks will automatically tagged on Facebook. Isn't it Cool? Let's see how it's possible with few clicks.. First of all, just have a look at first image where facebook tagging is happening -Just click on this image to see the large version and note facebook contacts as suggestions... Now, let's see how to achieve this capability in Elements Organizer... Let's go step by steps and hope that you will soon realize the way it works :1. Select a photograph in your Organizer and go to Share Tab on right.2. Click on 'Share to Facebook'3. Following dialog will be shown on clicking Facebook option.4. Now check the option for downloading facebook contacts and click Authorize...5. If you don't read carefully you will click on 'Complete Authorization' button in this dialog, but you are not done. It will show 'Error' dialog as you see below.6. After clicking Authorize, just go to your browser and click Allow button. Here you are authorizing Elements Organizer to use your contacts on Facebook7. When you click Authorize, now click 'Complete Authorization'.8. to continue with your upload, just fill the form shown below. It will information like Album Name, Location and Description etc.9. Click Done and file will be uploaded in few seconds depending upon size selected.10. The dialog shown above will be shown till file gets uploaded. After this, your Photograph should be visible on your Wall. But one thing would be missing :) ... No Face tags as of now :11. Now just go to Face Recognition workflow and see if you are able to see Facebook names while tagging faces. If, not Download contacts again by clicking 'Download/Update friends list to name people'.12. It will simply update your local contacts with all friends on Facebook. Go ahead with your tagging and whenever you upload tagged photographs, people will automatically be tagged on facebook. No extra effort after upload workflow.Time to try it out with your photographs and share your experiences.

4. Now check the option for downloading facebook contacts and click Authorize...

With recent release of Adobe Photoshop Elements, there is a wonderful capability added in organizer where-in we can face tag people in Organizer and same folks will automatically tagged on Facebook. Isn't it Cool? Let's see how it's possible with few clicks.. First of all, just have a look at first image where facebook tagging is happening -Just click on this image to see the large version and note facebook contacts as suggestions... Now, let's see how to achieve this capability in Elements Organizer... Let's go step by steps and hope that you will soon realize the way it works :1. Select a photograph in your Organizer and go to Share Tab on right.2. Click on 'Share to Facebook'3. Following dialog will be shown on clicking Facebook option.4. Now check the option for downloading facebook contacts and click Authorize...5. If you don't read carefully you will click on 'Complete Authorization' button in this dialog, but you are not done. It will show 'Error' dialog as you see below.6. After clicking Authorize, just go to your browser and click Allow button. Here you are authorizing Elements Organizer to use your contacts on Facebook7. When you click Authorize, now click 'Complete Authorization'.8. to continue with your upload, just fill the form shown below. It will information like Album Name, Location and Description etc.9. Click Done and file will be uploaded in few seconds depending upon size selected.10. The dialog shown above will be shown till file gets uploaded. After this, your Photograph should be visible on your Wall. But one thing would be missing :) ... No Face tags as of now :11. Now just go to Face Recognition workflow and see if you are able to see Facebook names while tagging faces. If, not Download contacts again by clicking 'Download/Update friends list to name people'.12. It will simply update your local contacts with all friends on Facebook. Go ahead with your tagging and whenever you upload tagged photographs, people will automatically be tagged on facebook. No extra effort after upload workflow.Time to try it out with your photographs and share your experiences.

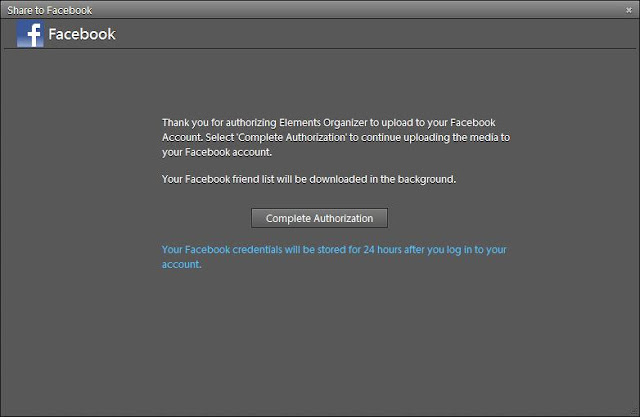
5. If you don't read carefully you will click on 'Complete Authorization' button in this dialog, but you are not done. It will show 'Error' dialog as you see below.

With recent release of Adobe Photoshop Elements, there is a wonderful capability added in organizer where-in we can face tag people in Organizer and same folks will automatically tagged on Facebook. Isn't it Cool? Let's see how it's possible with few clicks.. First of all, just have a look at first image where facebook tagging is happening -Just click on this image to see the large version and note facebook contacts as suggestions... Now, let's see how to achieve this capability in Elements Organizer... Let's go step by steps and hope that you will soon realize the way it works :1. Select a photograph in your Organizer and go to Share Tab on right.2. Click on 'Share to Facebook'3. Following dialog will be shown on clicking Facebook option.4. Now check the option for downloading facebook contacts and click Authorize...5. If you don't read carefully you will click on 'Complete Authorization' button in this dialog, but you are not done. It will show 'Error' dialog as you see below.6. After clicking Authorize, just go to your browser and click Allow button. Here you are authorizing Elements Organizer to use your contacts on Facebook7. When you click Authorize, now click 'Complete Authorization'.8. to continue with your upload, just fill the form shown below. It will information like Album Name, Location and Description etc.9. Click Done and file will be uploaded in few seconds depending upon size selected.10. The dialog shown above will be shown till file gets uploaded. After this, your Photograph should be visible on your Wall. But one thing would be missing :) ... No Face tags as of now :11. Now just go to Face Recognition workflow and see if you are able to see Facebook names while tagging faces. If, not Download contacts again by clicking 'Download/Update friends list to name people'.12. It will simply update your local contacts with all friends on Facebook. Go ahead with your tagging and whenever you upload tagged photographs, people will automatically be tagged on facebook. No extra effort after upload workflow.Time to try it out with your photographs and share your experiences.

6. After clicking Authorize, just go to your browser and click Allow button. Here you are authorizing Elements Organizer to use your contacts on Facebook.

With recent release of Adobe Photoshop Elements, there is a wonderful capability added in organizer where-in we can face tag people in Organizer and same folks will automatically tagged on Facebook. Isn't it Cool? Let's see how it's possible with few clicks.. First of all, just have a look at first image where facebook tagging is happening -Just click on this image to see the large version and note facebook contacts as suggestions... Now, let's see how to achieve this capability in Elements Organizer... Let's go step by steps and hope that you will soon realize the way it works :1. Select a photograph in your Organizer and go to Share Tab on right.2. Click on 'Share to Facebook'3. Following dialog will be shown on clicking Facebook option.4. Now check the option for downloading facebook contacts and click Authorize...5. If you don't read carefully you will click on 'Complete Authorization' button in this dialog, but you are not done. It will show 'Error' dialog as you see below.6. After clicking Authorize, just go to your browser and click Allow button. Here you are authorizing Elements Organizer to use your contacts on Facebook7. When you click Authorize, now click 'Complete Authorization'.8. to continue with your upload, just fill the form shown below. It will information like Album Name, Location and Description etc.9. Click Done and file will be uploaded in few seconds depending upon size selected.10. The dialog shown above will be shown till file gets uploaded. After this, your Photograph should be visible on your Wall. But one thing would be missing :) ... No Face tags as of now :11. Now just go to Face Recognition workflow and see if you are able to see Facebook names while tagging faces. If, not Download contacts again by clicking 'Download/Update friends list to name people'.12. It will simply update your local contacts with all friends on Facebook. Go ahead with your tagging and whenever you upload tagged photographs, people will automatically be tagged on facebook. No extra effort after upload workflow.Time to try it out with your photographs and share your experiences.

7. When you click Authorize, now click 'Complete Authorization'.

8. to continue with your upload, just fill the form shown below. It will information like Album Name, Location and Description etc.

With recent release of Adobe Photoshop Elements, there is a wonderful capability added in organizer where-in we can face tag people in Organizer and same folks will automatically tagged on Facebook. Isn't it Cool? Let's see how it's possible with few clicks.. First of all, just have a look at first image where facebook tagging is happening -Just click on this image to see the large version and note facebook contacts as suggestions... Now, let's see how to achieve this capability in Elements Organizer... Let's go step by steps and hope that you will soon realize the way it works :1. Select a photograph in your Organizer and go to Share Tab on right.2. Click on 'Share to Facebook'3. Following dialog will be shown on clicking Facebook option.4. Now check the option for downloading facebook contacts and click Authorize...5. If you don't read carefully you will click on 'Complete Authorization' button in this dialog, but you are not done. It will show 'Error' dialog as you see below.6. After clicking Authorize, just go to your browser and click Allow button. Here you are authorizing Elements Organizer to use your contacts on Facebook7. When you click Authorize, now click 'Complete Authorization'.8. to continue with your upload, just fill the form shown below. It will information like Album Name, Location and Description etc.9. Click Done and file will be uploaded in few seconds depending upon size selected.10. The dialog shown above will be shown till file gets uploaded. After this, your Photograph should be visible on your Wall. But one thing would be missing :) ... No Face tags as of now :11. Now just go to Face Recognition workflow and see if you are able to see Facebook names while tagging faces. If, not Download contacts again by clicking 'Download/Update friends list to name people'.12. It will simply update your local contacts with all friends on Facebook. Go ahead with your tagging and whenever you upload tagged photographs, people will automatically be tagged on facebook. No extra effort after upload workflow.Time to try it out with your photographs and share your experiences.

9. Click Done and file will be uploaded in few seconds depending upon size selected.

11. Now just go to Face Recognition workflow and see if you are able to see Facebook names while tagging faces. If, not Download contacts again by clicking 'Download/Update friends list to name people'.

10. The dialog shown above will be shown till file gets uploaded. After this, your Photograph should be visible on your Wall. But one thing would be missing :) ... No Face tags as of now :)

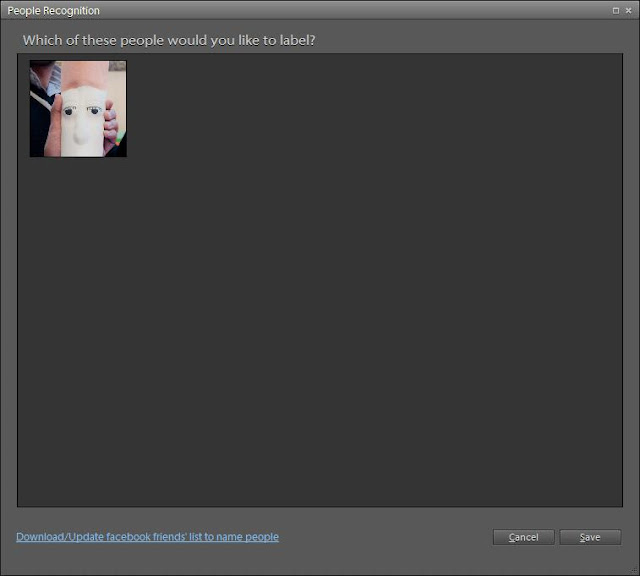
11. Now just go to Face Recognition workflow and see if you are able to see Facebook names while tagging faces. If, not Download contacts again by clicking 'Download/Update friends list to name people'.

12. It will simply update your local contacts with all friends on Facebook. Go ahead with your tagging and whenever you upload tagged photographs, people will automatically be tagged on facebook. No extra effort after upload workflow.

12. It will simply update your local contacts with all friends on Facebook. Go ahead with your tagging and whenever you upload tagged photographs, people will automatically be tagged on facebook. No extra effort after upload workflow.

Time to try it out with your photographs and share your experiences.

Time to try it out with your photographs and share your experiences.

2 comments:

Search This Blog